If you have quite a number of emails to handle every day, you may use an email application to make your work easy, for instance, Thunderbird. Due to reasons, you may store some emails on your Mac. However, data loss happens unexpectedly. If you run into this snag, here's a way to help you recover lost emails from Mac including Gmail, Outlook, Yahoo, Hotmail, Live mail, Thunderbird, Lotus Notes and so on. Now, let's cut the chase and jump to the workaround.
People Also Read:
● [Guide] How to Recover Deleted Files from Mac?
● [Hard Drive Repair] Data Recovery from Broken Hard Disk Drive
Mac computers use HDD (Hard Disk Drive) or SSD (Solid State Drive) to store all sorts of files. Technically speaking, data that save on the disk(s) are still recoverable even if deleted yet not overwritten by other files. Instead, deleted files get invisible and inaccessible by normal software.
That's why you need Data Recovery for MacBook/iMac/Mac Pro/Mac mini to recover email and its attachments/items. How it works?This intuitive and professional software requires users to have tech knowledge but to follow the following steps.
Don't Miss: To have further knowledge of Data Recovery, here is a full guide - [Hard Disk Recovery]The Best Data Recovery for Win/Mac.
Recoverable Data with A Variety of Extensions:
● Photos(18): JPG, TIFF/TIF, PNG, BMP, GIF, PSD, CRW, CR2, NEF, ORF, RAF, SR2, MRW, DCR , WMF, DNG, ERF, RAW, etc.
● Audio(8): AIF/AIFF, M4A, MP3, WAV, WMA, MID/MIDI, OGG, AAC, etc.
● Video(12): AVI, MOV, MP4, M4V, 3GP, 3G2, WMV, ASF, FLV, SWF, MPG, RM/RMVB, etc.
● Email(12): PST, DBX, EMLX, etc.
● Document(8): DOC/DOCX, XLS/XLSX, PPT/PPTX, PDF, CWK, HTML/HTM, INDD, EPS, etc.
● Others(3): ZIP, RAR, SIT, and other useful data
Step 1. Get Started with Data Recovery for Mac
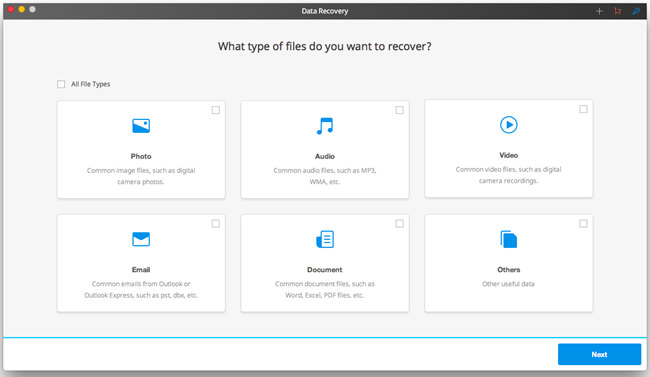
Now, you should download and install this software on your Mac. Data Recovery is well compatible with Mac running Mac OS X 10.13(High Sierra), 10.12(Sierra), 10.11(El Capitan), 10.10(Yosemite), 10.9(Mavericks), 10.8, 10.7, or 10.6. Then, launch the program and select the "Email" tab along with others you want to recover and go on with a click on "Next".
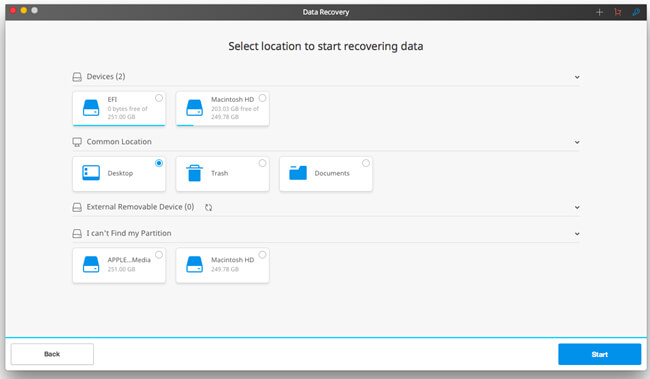
Step 2. Scan Your Mac for Emails
You'll be prompted to select a disk to scan for lost emails. Also, you can select certain folders like "Desktop", "Trash", and "Documents". After that, click the "Start" button. The default scanning is "Quick Scan". Then, you can select "Deep Scan" if no desired data are found.
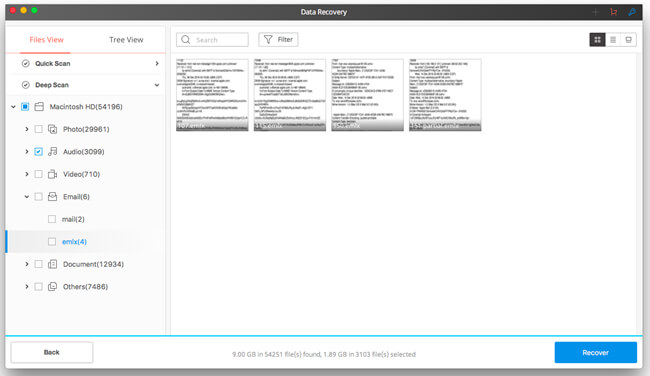
Step 3. Retrieve Emails to Mac
When the scanning completes, files will be listed on the interface. Please look up deleted emails and then select those you want to "Recover" to your Mac.
You should really allow Time Machine to automatically back up your whole Mac at a regular time so that you don't have to worry about any potential data loss.
