Sometimes, it happens that video files got lost on your Mac computer. The reasons can be varied. Some moved videos to the trash folder and emptied it without knowing that those videos might be in need someday. Others may accidentally reinstall macOS. What's more, some may suffer data loss after system breakdown. So, how to recover lost videos on Mac that you didn't back them up in time. Let's get down to the feasible method below.
People Also Read:
● How to Recover Android Data on Mac?
● How to Recover Files from SD Card?
Solution: How to Recover Deleted Video Files from Mac?
As you know, Mac uses HDD (Hard Disk Drive) or/and SSD to store a great number of files. Data currently stored on Mac take up certain space on the drive(s). However, once deleted, files are visually gone but still invisibly staying in that space only if overwritten by new content. To access these deleted files, you need the assistance of Data Recovery.
Data Recovery is a trustworthy and professional file recovery program for iMac/MacBook/Mac Pro/Mac Mini, which is able to start an advanced scanning on your disk to reach a variety of deleted files like videos, photos, audio, emails, and document. To know your way around Data Recovery, please read on.Note that Data Recovery can restore video files with up-to-12 types of extensions: AVI, MOV, MP4, M4V, 3GP, 3G2, WMV, ASF, FLV, SWF, MPG, RM/RMVB, etc.
Step 1. Get Started with Data Recovery
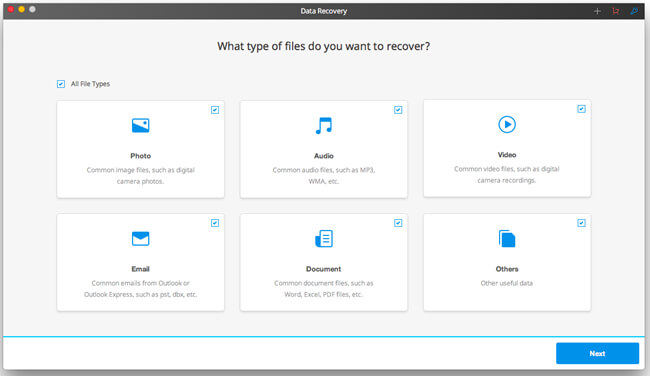
To begin with, you should install Data Recovery for Mac. Then, launch the program and select the "Video" option. You can also select those types of data you want to recover. Now, click "Next" to proceed.
Step 2. Scan for Lost Videos
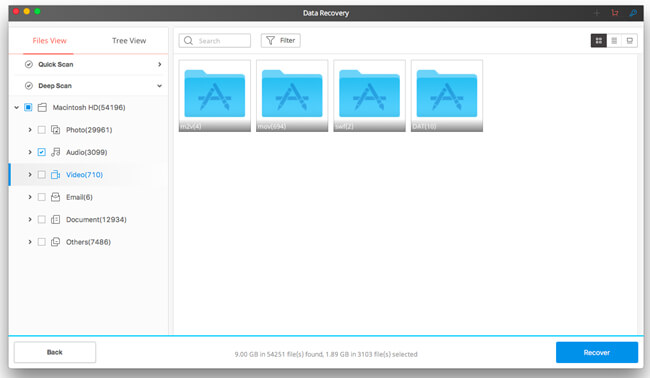
Here you should select the disk from which you want to recover deleted videos. Also, you can solely scan folders like desktop, trash, and documents. After that, click the "Start" button to go on.Note that the default scan mode is "Quick Scan". If no desired data are found, you can switch to "Deep Scan".

Step 3. Restore Videos to Mac
The scanning process may go for quite a while, please enjoy spare time with a cup of coffee or a book. When it completes, you can preview deleted videos and choose them to recover to Mac without a hitch.
Note: Don't Forget to Back Up Videos via Time Machine on Mac
To be honest, the success rate to recover lost files varies with the size of the files. Technically, data with a bigger size are harder to retrieve. Therefore, it's strongly recommended that you should enable Time Machine on your Mac, which can automatically back up whole data.
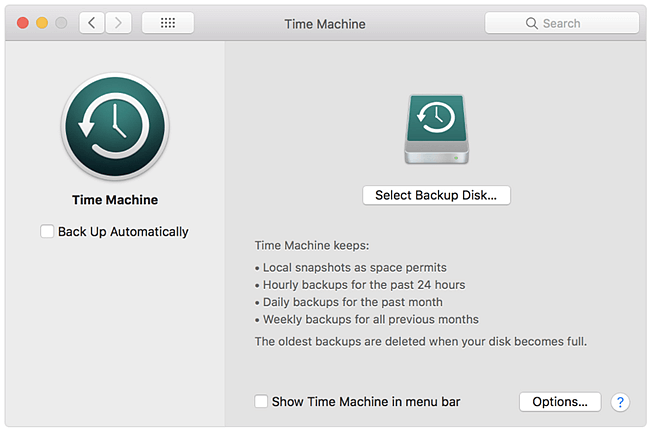
To use this free built-in feature, you need to have an external hard disk or purchase Apple's external storage solutions. Then, go to "Apple Menu" > "System Preferences" > "Time Machine". Click "Select Backup Disk" and set a disk as a backup disk. After that, click "Back Up Now" to start backing up your Mac. The first backup will take a long time. Please wait until it completes.
To get rid of the trouble caused by data loss, you should try Time Machine. This free and auto function can backup your data hourly, daily and weekly even without your knowledge.
