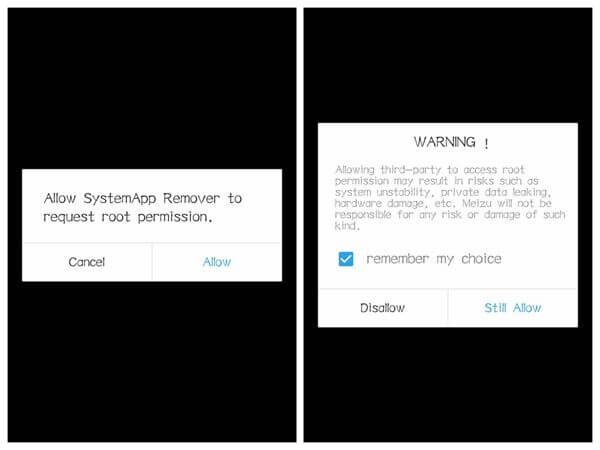
When you open a root app on your Android, taking Samsung Galaxy S7 Edge as an example, the app may require permission for rooting. And you should receive a note as the below screenshot, which reads, "Allow *** to request root permission". Then you need to tap the "Allow" button and "Still Allow".
People Also Read:
● How to Root Android Device with Kingo Root?
● How to Restore Data from a Rooted Android Phone?
But the thing is that, on some certain apps, there may be no such a popup notice occurred. Under such a circumstance, you will need to follow Part 1 to allow the permission, that is, to grant permission and allow root access. Then you can check the root status and root your phone under the instruction of Part 2. Now here we go.
Read before Rooting: Note that before granting root access and rooting your Android, it is significant to backup your Android data. This step is simple but quite important. Never skip it! Because some apps can cause a system crash.
The best and the easiest way to root your Android is to let professionals do it. If you're looking to get a premium root access, look no further than Unlock Partner. They have an expert team of technicians who are available 24/7 to help you get the root access on your phone, safe and sound.
Click here to get a premium root access
Part 1. Managing Root Permissions With the SuperSU App
SuperSU is a free but powerful root management tool for Android devices. If the permission request didn't show up, it can help you give root permission on Android. Please follow the instructions and grant permission in order to give root access.
Step 1. Download SuperSU
First of all, you need an app that manages root permissions of your apps. Download and install SuperSu on your Samsung Galaxy S7 Edge. Then reboot your device. You should see the SuperSU icon.
Step 2. Manage Root Permissions
To manage root permissions, activate the SuperSU app. Apps that have been granted or denied Superuser access are orderly listed. You can touch to change its permissions.
With SuperSU app on your Android, whenever an app is intended to request root permissions, it has to ask SuperSU on your phone.

Part 2. Root Android with Android Data Recovery
Android Data Recovery, as a multi-functional program, also allows users to root their Android without a hitch. All you should do is to connect to the software and let it do all the rest.
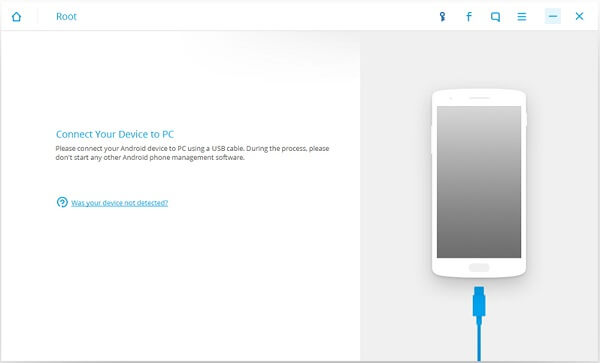
Step 1. Connect Device to PC
To start with, download and open Android Data Recovery on your computer. At the left pane, select and click "More Tools" > "Android Root". When in the "Android Root" page, you will be prompted to connect your Android device to the computer. Take use of your cable to help the connection. During the process, do not start any other Android phone management software. Then USB debugging is required.
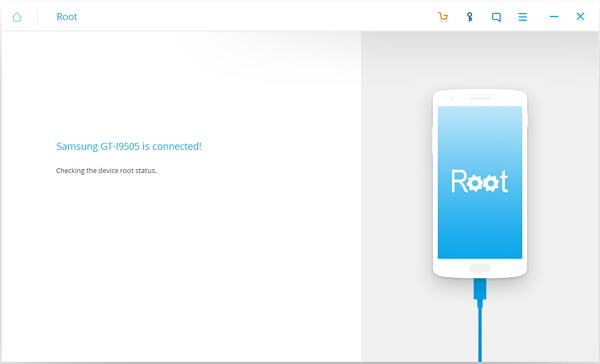
Step 2. Check Android Status
When your phone is recognized, you will have a note, which reads like "Samsung Galaxy S7 Edge is connected". Then Android Data Recovery will check the root status of your device. The result will be shown in the interface. There will be two cases:
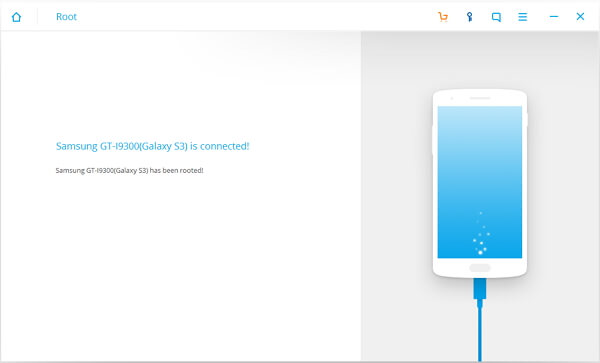
Case 1: Android Phone is Rooted
Should your Android phone bee rooted, you will have an interface with a note saying something like "Samsung Galaxy S7 has been rooted". You don't need to root your phone one more time.
Case 2: Phone is Unrooted
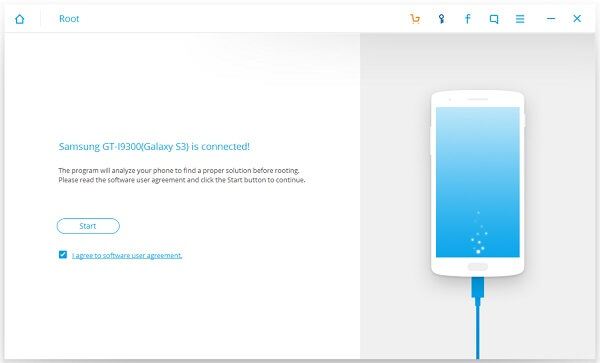
If your phone has not been rooted, you will have the interface as below. The program will detect your phone to find a proper solution before rooting. Please read the software terms and agreements and click the Start button to continue.
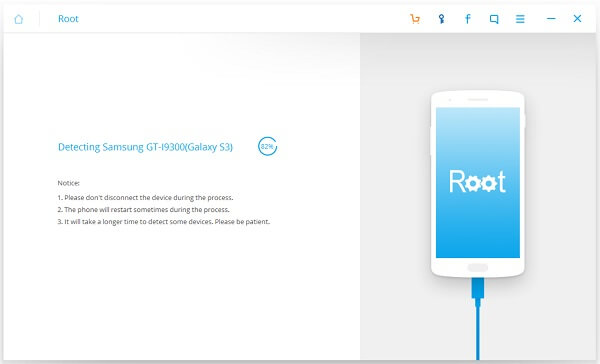
Next, the software will check if your phone is supported or not. Here are some notices you need to pay attention to:
First of all, please do not unplug your device during the detecting process.Second, the phone will restart sometimes when detecting.Last, it will take longer to detect some phones. Please wait patiently.
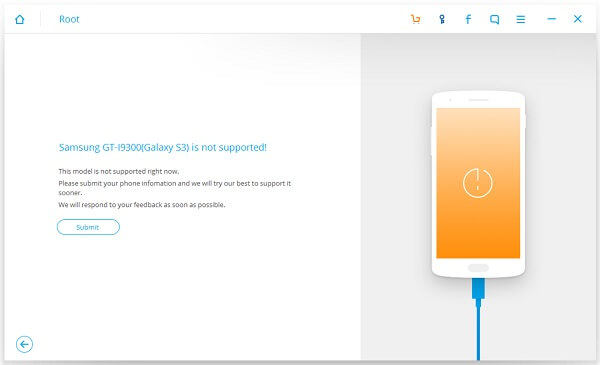
If your Android is unsupported, you will have an interface as below. You can submit your phone information if you need to root it urgently. The developer will respond to your feedback as soon as possible.
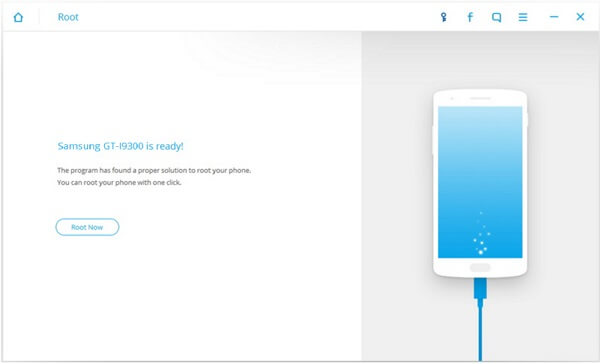
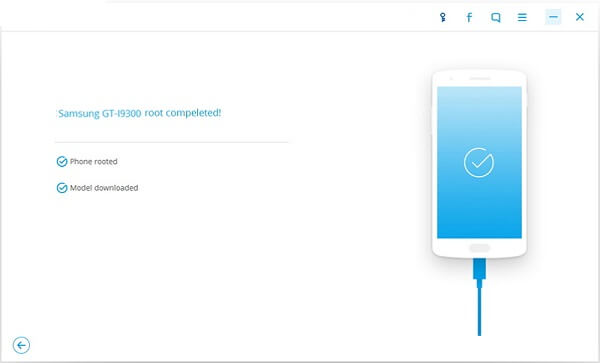
If your device is supported, you can check the "Root Now" button to start the rooting process. When the operation is completed, you will be prompted "Model downloaded" and "Phone Rooted".
If you ever want to unroot your device, turn on the SuperSU app > go to its Settings screen > tap the "Full unroot" option. Then your phone will be unrooted. This is definitely the easiest way to unroot your phone.
That's all. Questions and feedbacks are welcomed. Just leave your message.
