Well, most people backup their PCs, right? That is because lots of important files are stored on it. Likewise, smartphones have now been so ubiquitous that we should do the same things to make sure that our data will not lose accidently.
Why Do You Need to Backup Media Files?
It is not a hard thing to do. But, many people just don't get used to backing up files. And, often, we would regret when the important things get lost. It happens a lot. You might drop the phone in the water, delete data accidentally, do a factory reset without a full backup, etc. Actually, if busy, you can try all that cloud services, which automatically do the job. But, still, they are usually with limited storage. So, it is better for you to save them in the hard driver.
This article is written for those who own a Motorola phone and would like to save their photos, videos and audios. And with it, other kinds of Android data can also be transferred to PC. You can think of it as an alternative of Motorola Device Manager.
What I am going to talk about are Android Data Recovey, Android Manager and Mobile Transfer. When you choose the data types to transfer, you don't have to do it manually any more. Go to follow these guides to choose one suitable for yourself.
Part One: Media Transfer to PC Using Android Manager
Media files including pictures, videos, music, can be migrated via Android Manager, a mighty tool in data managing. You can download it to try.
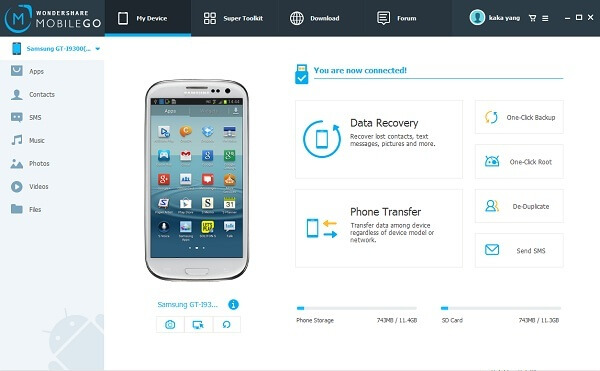
Step 1. Install Android Manager
If you run the program, you need to select the operating system of your device. Next, go to connect the Moto G to PC so that the following interface will come.
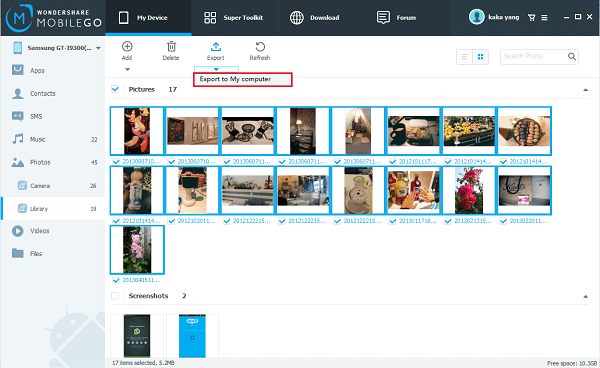
Step 2. Migrate Files from Motorola
Click "Photos"/"Music"/"Videos" to select the items on the screen, and move to "Export" > "Export to My Computer". If they are accomplised transferring, please open the folder to check the results.
Part Two: Backup Media of Motorola with Android Data Recovery
To save video/songs/pictures with Android Data Recovery is a rather easy thing to do. Two steps in total are needed. And all you need to do is downloading the program below and find a USB cable.
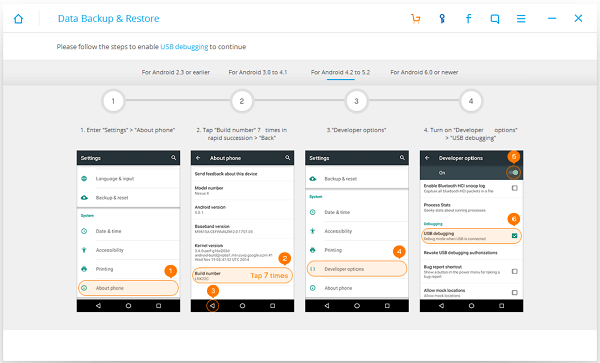
Step 1. Connect the Phone to PC
With a cable we mentioned, you can plug the device in. Launch the program and it will detect the handset. And, like every other phone managing software, Android Data Recovery will ask you to turn on USB Debugging. Following the instruction will help you deal with it.
Step 2. Transfer Data with A Few Clicks
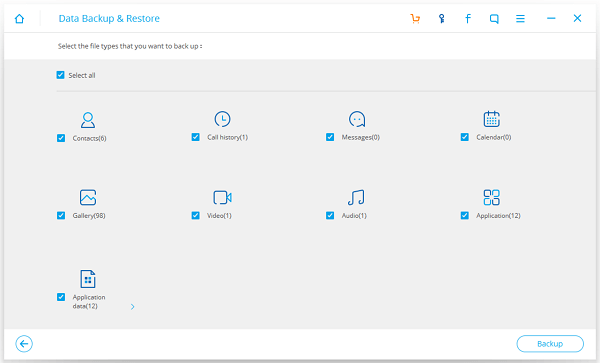
When the first step is finished, you can use the mouse to click on "More Tool">"Android Data Backup&Restore">"Backup". (Of Course, you need to choose "Restore" if in the other situation.) Picking file types will be the next thing to do. You can tick "Gallery", "Video" and "Audio". Finally, click on "Backup".
Part Three: Steps on How to Save Media Files on a Motorola Phone
Mobile Transfer is a tool for data transfer, which enables you to backup Motorola Media Files with its intuitive interface. It also helps you move data between two phones.
Step 1. Install Mobile Transfer and Get Motorola Connected
After you have the software on your PC, click to set it up. When it is finished, open the software in the same way you do the others. This interface below will appear. Then, connect the phone to your computer via a USB cable.
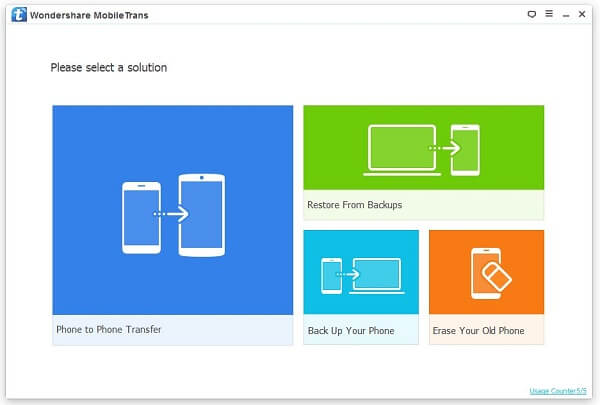
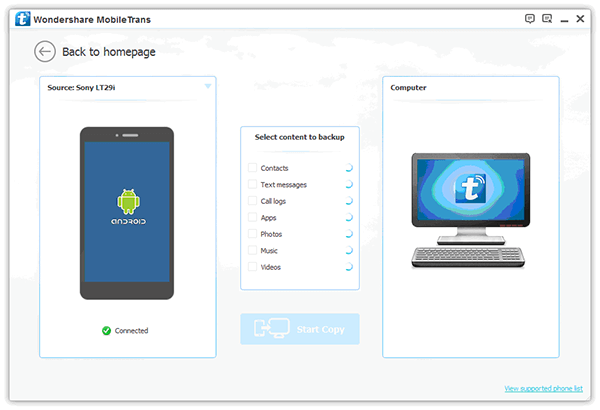
Step 2. Store the Motorola Data
Choose the section "Back Up Your Phone" in the color of turquoise and the window will turn into this. Your handset is on the left while the computer on the right, which means that the content will be transferred from one end to the other. The software is currently scanning for files. And when it is done, tick "Photos", "Music" and "Videos". Press the button "Start Copy" and wait patiently.
That is all. A quite easy thing to do, isn't it? Certainly, we would recommend the first one, Android Data Recovery, simply because it is more smooth. We believe that you have understood the steps above. And if not, leave us comment below. By the way, if you happen to lose data that are not backed up yet, try this guide to recover Android files.
Related Articles
- Transfer Contacts from Android to Computer: It is about how to save Android Phone Numbers.
- Export Android messages to Computer: It shows how to backup Android SMS.
- Transfer Photos from Android to Computer: It teaches you how to export Android photos.
- How to Backup Sony Xperia Media Files: It tells how to save Sony media files.
