Apart from copying files directly to your computer, have you ever wondered if there is any better way to transfer your Android photos conveniently. You may get mad because of trouble to find the folders and import pictures one by one. No doubt that it is a waste of time if there are so many of them, say 1,000 images. Basically, there are two ways to do this with tools, which will save you a lot of time. Wi-Fi and USB transportation are to be explained in the parts below. And of course, they are all of their own advantages and limits, which you will see at the end of this article.
People Also Read:
- How to Transfer Files Between Computer and Android
- How to Transfer Contacts from Android to Computer
Now, let’s get started with my favorite, DoTrans, Auto Play Dialog and Wi-Fi tool called WiFi File Transfer.
Part 1: How to Export Android Photos with DoTrans?
DoTrans is a versatile software offering data backup & restore, data transfer and data manager for users. It enjoys popularity across the world. Also, it works as an Android photo transfer, which allows users to download photos from android to computer without a hitch. It enjoys quite a few advantages, please take a look.
The goods of this program are list as below:
1. DoTrans supports not only Android but also iPhone, iPad and iPod Touch.
2. All devices running Android 2.3-9.0(Samsung, Google, HTC, HUAWEI and more) are supported by this program.
3. It can help you move 5 data types including photos, audios, videos, contacts and messages.
4. With simply one click, you can selectively copy pictures between your Android and computer within little time.
5. Able to import Android gallery to PC.
Download the trial version of DoTrans on your computer and try to import your Android pictures to it.
The operation is on Windows, if you use Mac, please refer to the related article on our website. But they are pretty similar.
Step 1. Run DoTrans on Your Computer
Download the software by clicking the download button. After installing DoTrans, run it on your computer.
Step 2. Connect your Android to PC
Connect your Android device to the computer via USB cable. Once your Android phone is detected by the program, all the data that stored in your Android phone can be shown in categories in the primary interface.
Step 3. Start Transferring Android Photos to Computer
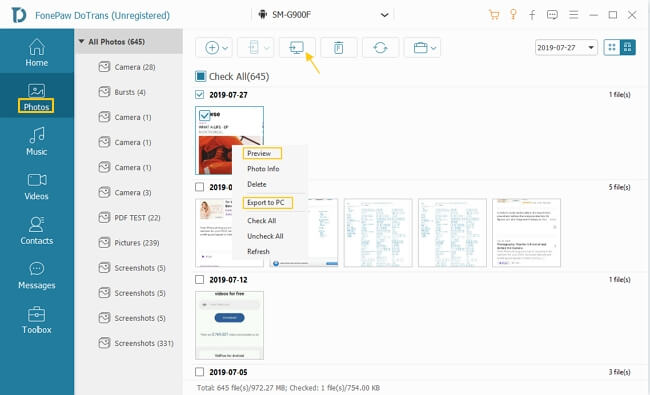
Click Photos in the left bar of the interface and you can see a list of your Android photos. Choose the pictures that you want to move into your computer, then, click Export to PC to start transferring. The program will copy pictures off an android phone and transfer them to your PC.
Note: Before transferring, you can select the picture and right-click it to preview the picture. If you want to transfer all the pictures to your computer, simply click Check All>Export to PC.
Part 2:How to Transfer Images from Android via AutoPlay?
Actually, most Android phones support to directly transfer photos/videos to computer via AutoPlay (currently available only on Win system). Have you ever noticed that there is an Auto Play dialog every time you connect your device to computer? If you still have no idea how to do it, why not check out the following step-by-step guide, taking Samsung Galaxy S8 as an example.
Step 1. Hook up your device to computer with USB cable and enable USB debugging.
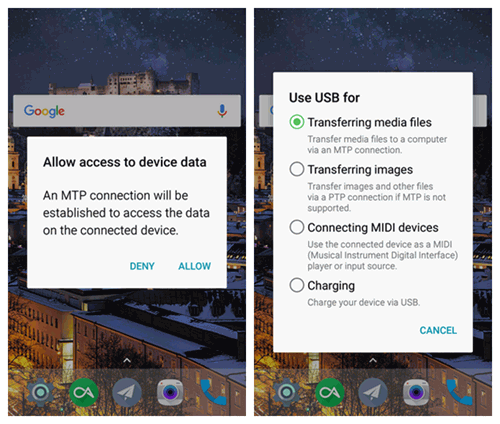
Step 2. Tap "Allow" on Android when prompted to "Allow access to device data".
Step 3. Drag down the pull-down notifications bar and touch "Transferring media files via USB" option.
Step 4. Select "Transferring media files" (Or you cannot transfer photos to PC).
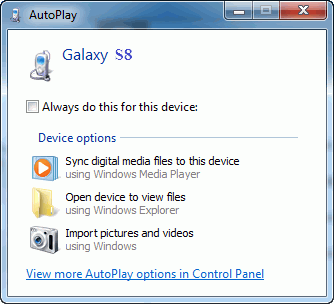
Step 5. Auto Play dialog will show up on the computer. Please select "Open device to view files" option.
Step 6. Locate and select "Pictures" folder.
Step 7. Now, copy and save the whole folder to desktop or somewhere on computer.Note that if the dialog doesn't show up, please get help from this post on HowtoGeek.
Part 3: How to Upload Pictures to Computer with WiFi File Transfer
How to transfer photos from android to pc without usb cable? Wi-Fi File Transfer is a great app that you can get on Google play. Rated 4.1 by over 30,000 users. Click on the link to download the package.
Advantages of WiFi File Transfer:1. No need for USB cables2. Simple interface and operation3. Efficient
Step 1. Set Up the App
Usually, you can just leave the settings and click on the “Start” button directly. But if the network is public, please make sure that a password is set for safety issues. You can use the feature “Access Password”.
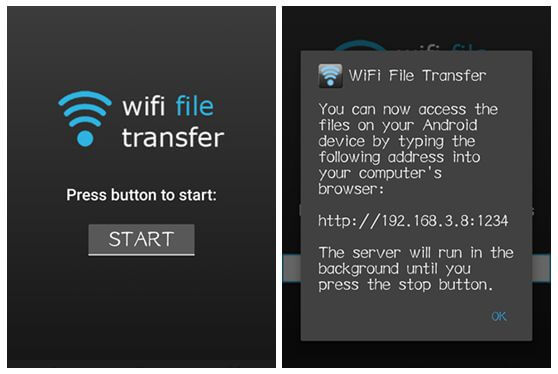
Step 2. Copy Photos to Computer
After you press the button “Start”, there will be a pop-up window showing the IP address. You need to go to the computer and enter it into the web browser. And this is how you begin to transfer the data.
Well, this is the end. It is obviously that Android Manager is of better features. Copying files via Wi-Fi is not stable enough and slower than using USB cables. You might have a copy of the cracked images without knowing it. Plus, Android manager can also make use of the network if needed. To explore more, you can download Android Manager and try it by yourself. With this software, you can also download photos from android to computer and upload pictures from android to computer. Samsung Photos, as well as contacts, text messages, call logs, videos, music and apps are transferable if you try this awesome software.
