"I upgraded from Windows 8.1 to Windows 10. The upgrade was very smooth except that W10 does not recognize my 2nd hard drive (no issues with W8.1). The drive is recognized in BIOS but does not show at all in W10 Disk Management. I've also started in Safe Mode but have the same issue, no 2nd hard drive. Is there a fix available? Any help is appreciated as I need to be able to access the data and documents on the 2nd drive." - Posted on Microsoft Community
People Also Read:
● [Hard Drive Repair] Data Recovery from Broken Hard Disk Drive
● Is It Possible to Get Files Back on a Formatted Computer?
Yes, somehow it really happens that your Windows PC/laptop cannot detect your internal or external hard disk drive, making great nuisances to you. However, why this is happening? How to repair a hard disk that is not recognized or showing up on the computer? How to retrieve files from an unresponsive hard disk? The questions are answered below.
Part 1: Why Is The External/Internal Hard Drive Not Detected?
Knowing what causes the trouble is always conducive to producing feasible solutions. There are four possible reasons why your computer cannot detect the external or internal hard drive. Please check them out and see which one might be to blame in your case.
1.The driver is not properly installed. If you're inserting a new internal drive or using an external disk, it needs a driver to drive it well. Therefore, make sure that the drive is well installed at first.
2. The USB port stains with dirt, water, or something else. Make sure the port is clean before you connect the hard disk to it. If not, use a fabric to gently clean it up.
3. Make sure that the hard disk is not water-damaged or having been unoccupied for a long time. If a hard disk leaves unused for long, it would be insensitive in use due to reasons.
4. Hard Disk Drive is not enabled in the BIOS. BIOS is short for Basic Input/Output System, which functions as non-volatile firmware used to perform hardware initialization during the booting process (power-on startup). If your hard drive is not showing up, you may need to enable it by turning it on system startup, but different computer manufacturers have different methods to enter Setup.
Part 2: How to Repair the 'Not Recognized/Showing Up' Problem?
No worry. Please try to solve your hard disk not recognized issue via the following solutions, which I collect from forums to forums.
Method 1. Connect your hard disk with another USB port.
Method 2. Try another connecting cable to hook up to computer
Method 3. Connect your Seagate hard drive to another computer and see whether it works.
Method 4. Run the Hardware and Devices troubleshooter and check if it helps.
Step 1. Press "Windows" Key, then click on the Search bar.
Step 2. Type "Troubleshooting" without the quotes and click on Troubleshooting.
Step 3. Then click on "View All" on the left panel of the screen.
Step 4. Click on "Hardware and Devices".
Step 5. Click "Next" and follow the instructions.
Method 5: Check the status of the drive in the device manager.
Step 1. Press the "Windows" Key and the "R" Key.
Step 2. Type "devmgmt.msc" without the quotes and hit on the "Enter" Key.
Step 3. Expand Disk Drive. If you are able to find the driver for the external drive.
Step 4. Then again right click on the driver and click on "Properties".
Step 5. Check the device status of the disk.
Part 3: How to Recover Data from HHD That Is Note Detected?
If the workarounds above didn't work on your case but you still want to retrieve some files, you'd better check out this way. Data Recovery is a reliable software for hard disk recovery. Even if the internal/external is not showing up on your Windows computer, Data Recovery will not let you down. Please get down to the following for more details. Don't Miss: To have further knowledge of Data Recovery, here is a full guide - [Hard Disk Recovery]The Best Data Recovery for Win/Mac.
Recoverable Data with A Variety of Extensions:
- Photos(18): JPG, TIFF/TIF, PNG, BMP, GIF, PSD, CRW, CR2, NEF, ORF, RAF, SR2, MRW, DCR , WMF, DNG, ERF, RAW, etc.
- Audio(8): AIF/AIFF, M4A, MP3, WAV, WMA, MID/MIDI, OGG, AAC, etc.
- Video(12): AVI, MOV, MP4, M4V, 3GP, 3G2, WMV, ASF, FLV, SWF, MPG, RM/RMVB, etc.
- Email(12): PST, DBX, EMLX, etc.
- Document(8): DOC/DOCX, XLS/XLSX, PPT/PPTX, PDF, CWK, HTML/HTM, INDD, EPS, etc.
- Others(3): ZIP, RAR, SIT, and other useful data.
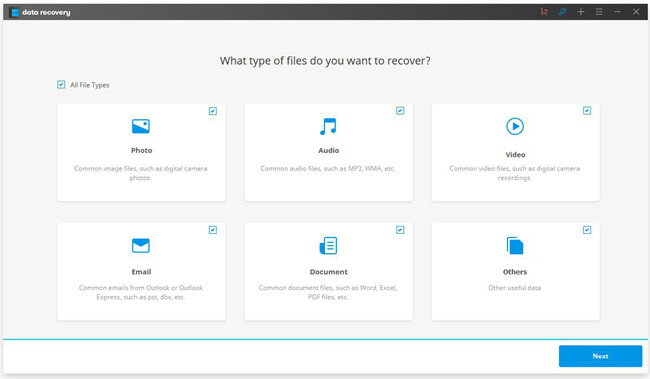
Step 1. Get Started with Data Recovery
Download and install Data Recovery for Win with a click on the download button above. After launching the program, the main page is shown as the following image. Now, you need to select types of file to start recovering.
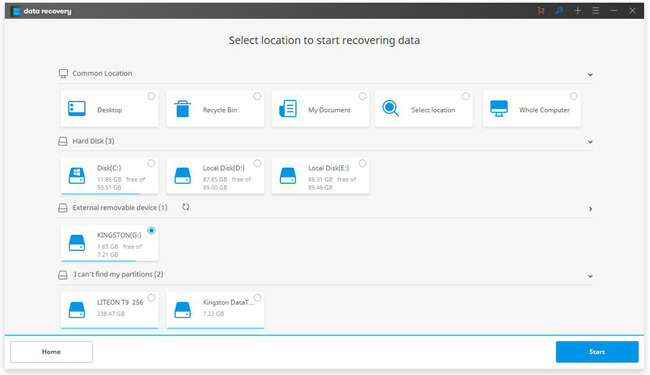
Step 2. Locate the Faulty Disk
On the next screen, you need to select a location to scan. Please look for the faulty internal or external disk drive and click to highlight it. Then, go with a click on "Start".Note that the default scanning mode is "Quick Scan", but for an advanced scan, you can try "Deep Scan".
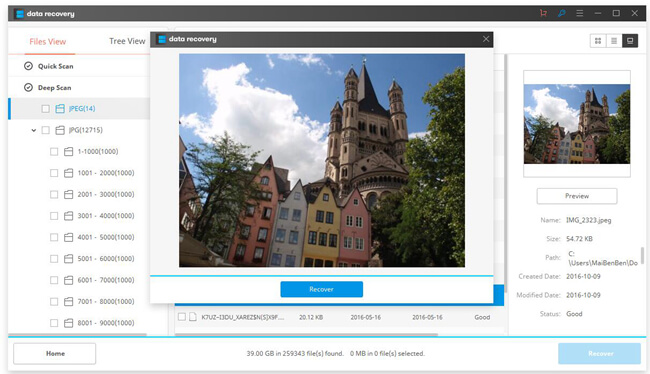
Step 3. Recover Files from Faulty Hard Disk
Since it performs a thorough scanning on the whole hard disk, the process may take hours to finish, so please play with your smart gadget instead of doing nothing but waiting. After that, you can preview data found via the software and click "Recover" to get them back.
That's all. If you don't trust the tutorial, you can try the free trial of Data Recovery on your own. Hope this guide helps you out and don't hesitate to contact me when a question is lingering in your mind.
